Installing Agents From ELM Console
An ELM Server can monitor multiple Agents and a Service Agent can be monitored by multiple ELM Servers. Each Agent maintains separate configuration, collection set, and cache files for each ELM Server that monitors the Agent. Three types of agents are available:
IP Virtual Agents: monitor Windows and non-Windows systems such as firewalls remotely from the ELM Server. They can run Monitor Items to monitor TCP based services like FTP, TCP ports, or listen for syslog and SNMP information.
Virtual Agents: monitor Windows systems monitored remotely from the ELM Server, without installing software on the monitored system.
Service Agents (ELM Standard): monitor Windows systems with the ELM Agent service installed on the monitored system.
You can install Agents remotely from the ELM Console, or you can install them manually on the target machine (see Installing Service Agents Using Setup Package below).
To Install Agent(s):
1.Right-click on the Monitoring container in the ELM Console and select New | Agent. The Agent Deployment Wizard will launch. When the Welcome dialog is displayed, click Next to continue.
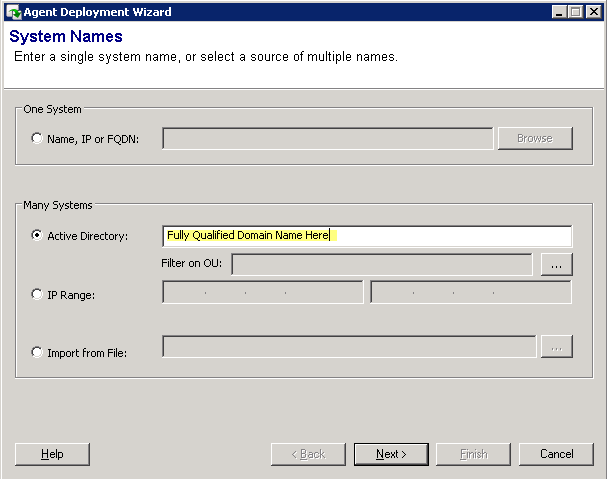
2.From the System Names dialog box, there is the option of installing One System or Many Systems.
3.In the Many Systems area, there are three options: Active Directory, IP Range, and Import from File.
•Active Directory: Specify the Active Directory domain to search. Selecting the ... in the box marked Filter on OU: allows you to further specify particular Organizational Units within the domain to search.
•Scan IP Range: Specify a range of IP addresses to search for computers or devices. The ELM Server will query port 139 and look for responses.
•Import From File: Use the ellipsis button to browse to a CSV (comma-separated value) file containing a list of machines or devices on which to install Agents. After the import, the Agent Deployment Wizard will determine if it what type of agent to install.
The CSV file has the following syntax:
Agent1,
Agent2,
Agent3,
4.On the Next dialog, Systems Found, a Succeeded or Failed message will indicate if that system is online by using Ping.
Click a system or multiple systems using ctrl or shift, right-click on the system(s) name to Add a System, Select All, or Selected Systems | Remove.
To change service agent defaults, select the Defaults button. Change the defaults to match the needs in your environment.
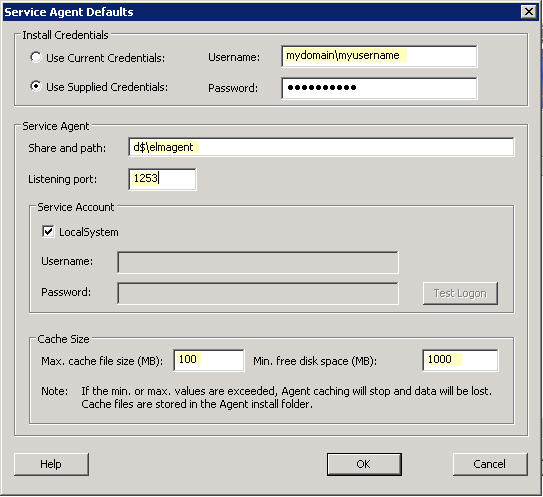
•Use the Install Credentials to specify the account used to connect and install the service agent. This account must have local administrator rights on the destination. For a DC, this would be a Domain Administrator account.
•Use the Share and path to specify the destination share and path for the service agent install. The directory must already exist.
•Using the Listening port to change the port that the agent will use.
•Use the Minimum disk free space in MB to limit how much disk space a cache file will take.
•Use the Maximum cache file size in MB to limit the size of the cache file.
Note
Once an Agent has been configured to listen on a specific port, you cannot change the port. If you want the Agent to listen on a different port, you must remove then re-add the Agent using the new port.
5. The System Scan Summary dialog displays the scan results and gives the status to common agent installation issues. If there are any errors, Advanced is automatically checked. If there are no errors, but a few systems need to be customized, check Advanced before selecting next.
6. The Agent Operating Mode dialog is used to change the agent to a different mode and/or modify specific agent(s) port.
•Select Show only Errors to filter the agents with errors.
•Select a system that is not available and Remove by selecting and right clicking | Selected Systems | Remove.
7. The Log On for Service Agents dialog is used to change the account used for the Service Agent(s). Select multiple agents by using ctrl and mouse click or shift and mouse click.
8. The Service Agent Install Location dialog is used to change the installation share and path. Select multiple agents by using ctrl and mouse click or shift and mouse click.
•Use the Min. free disk (MB) to limit how much disk space a cache file will take.
•Use the Max. cache file (MB) to limit the size of the cache file.
9. The Monitoring Categories dialog is used to assign agents to Monitoring Categories. Select multiple agents by using ctrl and mouse click or shift and mouse click.
10.The Monitoring Products dialog is used to assign agents to Monitoring Products. Select multiple agents by using ctrl and mouse click or shift and mouse click. The Avail column show the number of licenses available for that product. The Used column shows the number of licenses used for that product.
11.The Install Agents dialog displays the status of all of your selections before selecting Next to install.
12.The Install Summary dialog displays the status of the installation. Click Finish to exit the Agent Deployment Wizard.
Installing Service Agents Using a Setup Package
If the system you wish to monitor is on the other side of a firewall, in a DMZ environment, or located in an environment that restricts the use of NetBIOS and RPC endpoint ports, you can use the ELM Setup package to install a Service Agent on the remote system and then use the Agent UI or Registration Wizard to register the Agent with the ELM Server and select monitor items for the Agent.
To install a Service Agent using ELM Enterprise Manager Setup:
1.Double-click the ELM7.50_nnn.exe file you downloaded (where nnn is the build number). The Setup Wizard will launch.
2.Make sure the Service Logon is correct, and type in the password you wish to use for the Local ELM Database, if applicable.
3.Select the components you wish to install and check the box agreeing to the licensing terms.
4.Click Install to start the Service Agent install process.
5.When the installation has completed, the Register Server Wizard will launch. In the Name field, enter the host name, IP address or fully-qualified domain name for the ELM Server you wish to register, or click the Browse button to browse the network for the ELM Server you wish to register. In the Port field, enter the TCP port on which the ELM Server is listening. By default, ELM Servers listen on port 1251. The port is configured at the ELM Server from the ELM Server Control Panel applet. Click Next to continue.
6. A logon prompt will appear. Provide an account that has administrative rights on the ELM Server computer. If a domain account is specified, use the pattern domain\user in the Username field. Click OK when an account and password have been entered.
7. The Monitoring Products dialog box will appear. Put a check in the box to the left of the type of Monitoring Product you want this agent to have. Click Next to continue.
8.The Monitoring Categories dialog box will appear. Put a check in the box to the left of each Category you want this Agent to join. You may view the properties of any Category by right-clicking the item and selecting Properties. Click Finish to save the Agent settings and ELM Server registration.
9. Click Finish to close the install wizard.
To install an agent using EAM Agent-Only MSI Package:
1.From an Administrative command prompt, navigate to the folder the .msi package is in and type its name to start Setup.
2.Click Next and accept the License Agreement.
3.Click Next again and verify Agent is only component being installed. Change directory path if necessary.
4. Verify path and click Install.
To uninstall a Service Agent that was installed using setup:
1.Open the Windows Control Panel and double-click 'Uninstall A Program' then select ELM Enterprise Manager (or ELM Agent, if only an agent is installed) and click Uninstall'.
2.Select the product and click the Change button.
3.If the Service Agent is the only ELM component installed on this system, or if there are other ELM components (e.g., ELM Server or ELM Console) and you wish to uninstall everything, deselect the check-box for each component you wish removed. Any ELM components installed on this system that you do not wish to remove should have a checked check-box. select 'Repair/Modify' and the unchecked components will be removed. (EAM Agent .msi Only: When the component dialog is shown, change the Service Agent from 'Will be installed on local hard drive' to 'Entire feature will be unavailable'. Then complete the Wizard to remove it.)